
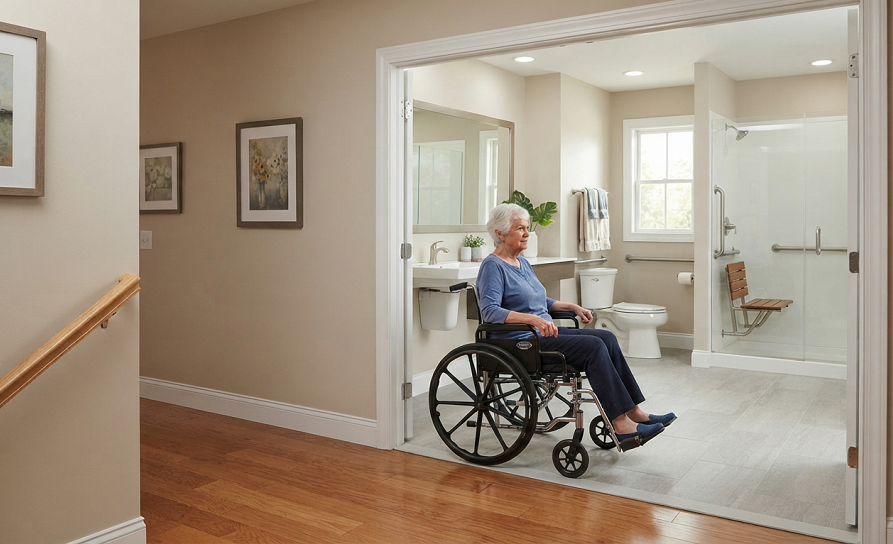
My mother-in-law slipped in her bathroom two winters ago. Nothing broken, thank goodness, just a bruised hip and a badly shaken ego. But that phone call at 6 a.m. sent me straight into her powder-blue 1980s bathroom with a tape measure and a list of everything that needed to change.
If you’re reading this, you’re probably in the same spot I was. Maybe it’s a parent, maybe it’s your own knees reminding you that stepping over a tub edge isn’t as easy as it used to be. Either way, you want a bathroom that’s safe without looking like a hospital room. I get it. I’ve spent over a decade remodeling bathrooms for clients ranging from twenty-somethings to a ninety-one-year-old retired schoolteacher who still lives alone and mows her own lawn.
Here’s what actually works, what’s worth the money, and what I’d skip if I were doing it again.
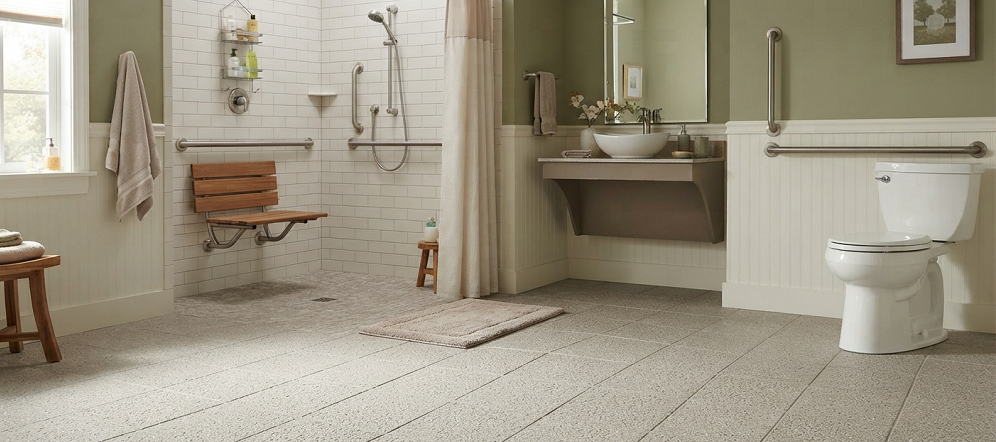
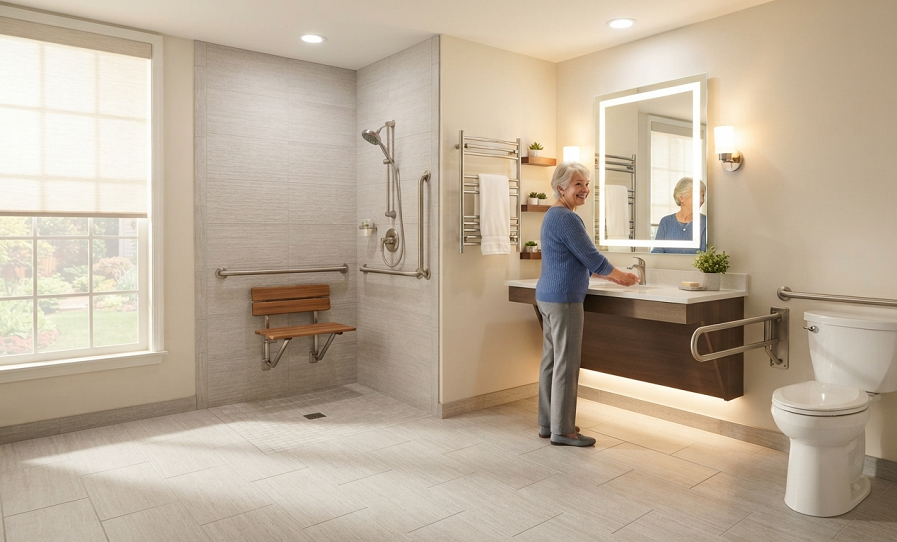
1. Curbless Walk-In Showers (Ditch the Step, Ditch the Fall Risk)
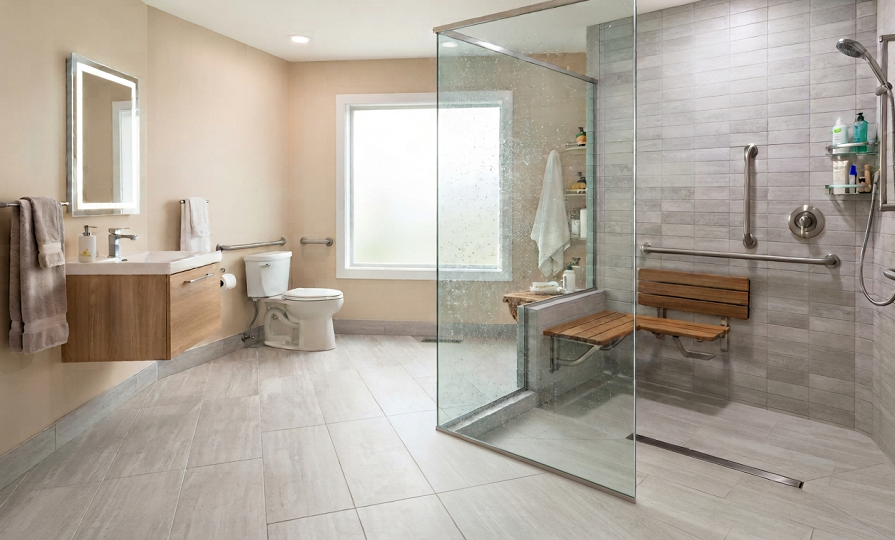
A curbless shower is the single biggest upgrade you can make for aging-in-place bathroom design, full stop. No lip to trip over, no threshold to lift a walker or wheelchair over, just a smooth, gently sloped floor that drains water away from the rest of the room.
I installed my first one back in 2015 for a client recovering from hip surgery, and I remember thinking it was overkill. It wasn’t. She told me a year later that it was the reason she never once worried about getting hurt getting in or out. That stuck with me, and now I recommend it to almost every client over 55, even the ones who insist they’re “still spry.”
The trick is in the framing, not the tile. You need a linear drain along one wall and a subfloor that’s been sloped correctly before a single tile goes down. This is not a weekend DIY project unless you’re genuinely comfortable with plumbing and self-leveling underlayment. I’ve seen homeowners try to shortcut this with a pre-made pan, and the water ends up pooling in the wrong spot within six months.
Budget-wise, expect $8,000 to $15,000 for a full curbless shower conversion, more if you’re moving plumbing lines. It’s not cheap, but compared to the average cost of a hip fracture recovery, it’s a bargain. If your budget is tight, at minimum reduce your existing curb to under half an inch and add a rubber threshold ramp.
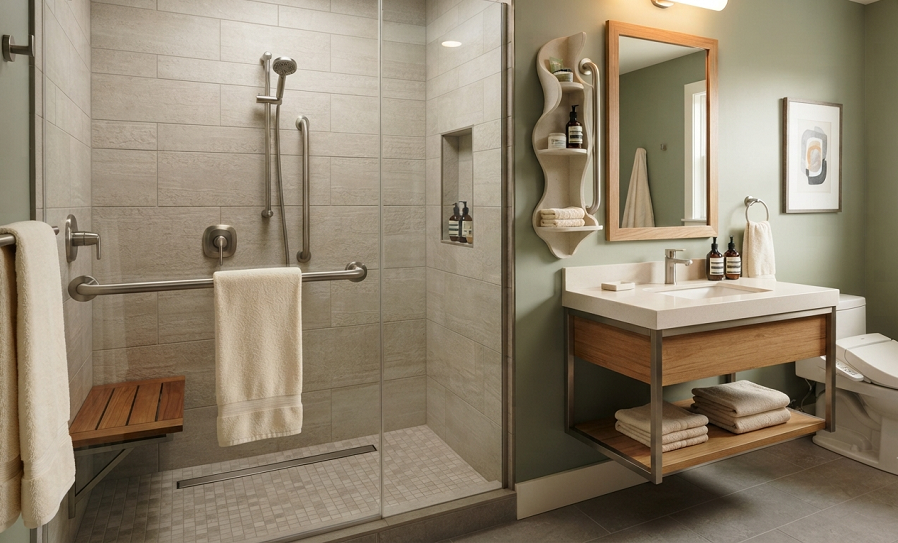
2. Grab Bars That Don’t Look Like Grab Bars (Because Nobody Wants a Hospital Bathroom)
Here’s an opinion that’ll ruffle some feathers: those chrome towel bars people install “just in case” are not grab bars, and relying on one to catch a fall is a genuinely bad idea. Towel bars are attached with plastic anchors rated for maybe 20 pounds. A grab bar needs to hold 250 to 300 pounds of dead weight, mounted directly into wall studs or blocking.
The good news is grab bars have come a long way from the beige institutional look. Brands now make them in matte black, brushed gold, and oil-rubbed bronze that pass for towel bars or shelf brackets at a glance. I put a set of angled bars in a client’s shower last year finished in the same brushed nickel as her faucet, and her sister didn’t even clock them as grab bars during a visit.
Placement matters more than most people realize. You want one vertical bar near the shower entrance for stability while stepping in, a horizontal or diagonal bar along the shower wall at hip height, and one beside the toilet. I always tell clients to think about the actual motion of sitting down, standing up, and stepping over a threshold, then place bars where a hand would naturally reach during that motion.
If you’re renting or not ready to commit to permanent installation, there are now suction-cup and clamp-style bars rated for real weight, though I’d still treat those as a stopgap rather than a permanent solution. Blocking behind drywall is cheap insurance, and if you’re already opening up walls for any other reason, add blocking everywhere a bar might someday go, even if you don’t install the hardware yet.
3. Comfort-Height Toilets (A Small Swap With a Big Payoff)
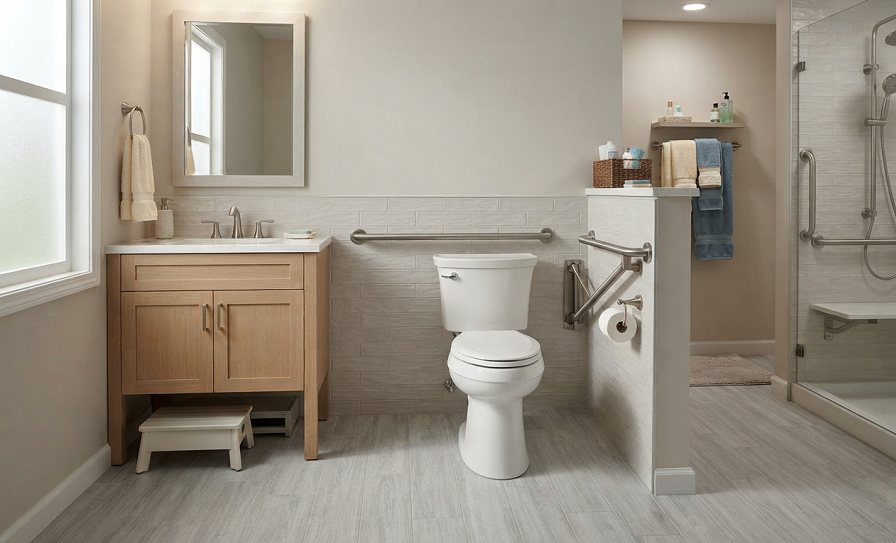
Standard toilets sit around 15 inches off the floor. Comfort-height toilets, sometimes labeled “ADA height,” sit at 17 to 19 inches, which is a small difference on paper but a huge one on aging knees and hips. Standing up from a lower seat puts way more strain on joints than most people expect until they try the taller version.
I swapped my own father’s toilet out a few years back after he mentioned his knees were “acting up” in the mornings. He called me two weeks later just to say thank you, which is not something my dad does often. That’s when I started recommending this swap to basically everyone, regardless of age, because honestly it’s more comfortable for most adults anyway.
This is one of the easier upgrades on this list. If your existing rough-in and supply line are standard, swapping to a comfort-height model is a half-day job for anyone comfortable with basic plumbing. Expect to pay $200 to $500 for the toilet itself, plus installation if you’re hiring it out.
One quick side note: pair the taller toilet with a nearby grab bar or a toilet frame with armrests for an even bigger safety boost. The combination of height plus something to push off of makes standing up dramatically easier, especially first thing in the morning when joints are stiffest.
4. Slip-Resistant Flooring That Doesn’t Scream “Nursing Home”
Traditional glossy tile is genuinely dangerous once it gets wet, and bathroom floors are wet more often than we’d like to admit. I’ve walked into more than one client’s bathroom where beautiful, glass-like porcelain tile turned into a skating rink the second the shower ran.
The fix isn’t ripping everything out for rubber matting. Textured porcelain tile now comes in finishes with a coefficient of friction rating specifically designed for wet areas, and honestly, most people can’t tell the difference by looking at it. I steer clients toward tile with a DCOF rating of 0.42 or higher for wet zones, which sounds technical but any tile showroom associate can point you to it.
Grout lines matter here too, and this is something a lot of homeowners overlook. Smaller tiles with more grout lines actually improve traction because grout has more texture than glazed tile. I’ve started recommending mosaic-style tile in shower floors specifically for this reason, not just for looks.
If a full floor replacement isn’t in the budget right now, slip-resistant treatments and coatings exist that can be applied to existing tile. They’re not a permanent fix and need reapplication every year or two, but they buy time. Just skip the adhesive-backed bath mats with suction cups; I’ve seen those peel up at the edges and become a tripping hazard themselves within a year.
5. Better Lighting (The Upgrade Everyone Forgets)
This one doesn’t get talked about enough in aging-in-place bathroom design, and it drives me a little crazy, because poor lighting is behind more bathroom falls than people realize. A dim, single overhead fixture creates shadows exactly where you need to see clearly, like the edge of a step-down shower or the transition between tile and bath mat.
I always design bathroom lighting in layers now. That means a bright, evenly distributed ceiling fixture, task lighting at the vanity that doesn’t cast shadows on the face, and a low-level night light, ideally motion-activated, near the floor for those 2 a.m. trips. That last one alone has prevented more stumbles for my clients than almost anything else on this list, and it costs about fifteen dollars.
Color temperature matters too. Warm, yellowish light feels cozy but makes it harder to judge depth and distance, which is exactly what you don’t want on a wet floor. I aim for 3000K to 4000K bulbs in bathrooms, bright enough to see clearly without feeling like an operating room.
Don’t skip switches, either. Motion-sensor light switches mean nobody’s fumbling for a switch plate in the dark, and illuminated switch plates are a cheap upgrade that make a real difference for anyone with declining vision. My eighty-something client with the mowing habit told me the motion light was her favorite change in the entire remodel, beating out a $12,000 shower renovation. Go figure.
6. Wider Doorways and Smarter Layouts

A standard interior door is 28 to 32 inches wide, which sounds fine until you’re trying to get a walker or wheelchair through it. Widening a bathroom doorway to at least 32, ideally 36, inches clear opening makes an enormous difference for anyone with mobility equipment now or in the future.
This is a bigger project than most on this list because it usually means moving the door frame and sometimes the hinges of an adjacent wall, but there’s a shortcut. Offset or swing-clear hinges let an existing door swing completely clear of the opening, adding two to three inches of usable width without touching the framing. It’s one of my favorite cheap tricks in this whole trade, honestly.
Layout matters just as much as door width. I plan for a minimum 5-foot turning radius wherever possible, so a wheelchair or walker user can actually rotate without backing out of the room. Pocket doors are another great option here since they eliminate the swing radius a hinged door needs entirely, freeing up floor space for maneuvering.
If a full layout overhaul isn’t realistic right now, at minimum remove anything that narrows the path, things like decorative half-walls, bulky vanities with legs that jut out, or freestanding shelving units. I once found nearly four extra inches of clearance for a client just by swapping her pedestal sink for a wall-mounted one with open space underneath.
7. Lever Handles and Touchless Faucets (Small Change, Big Difference for Arthritic Hands)
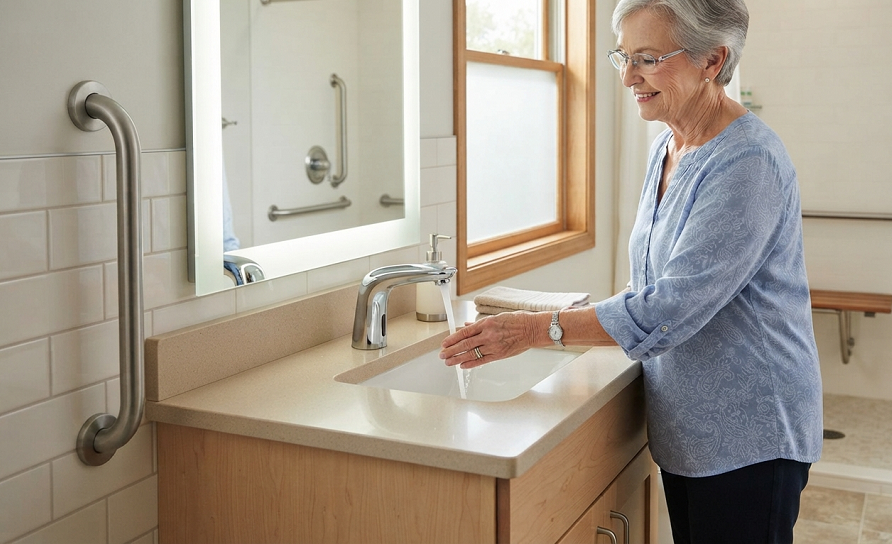
Round doorknobs and traditional twist faucet handles require a gripping and twisting motion that gets genuinely painful with arthritis, which affects a huge chunk of the population over 65. Lever-style handles only need a push or a downward motion, no gripping required.
This swap is about as cheap and easy as home upgrades get. A lever-style door handle runs $15 to $40 and takes maybe twenty minutes to install with a screwdriver. Faucet levers cost a bit more, usually $80 to $200 depending on finish, but the installation is still a manageable DIY job for most people.
Touchless or motion-sensor faucets take this even further and I’ve become a genuine believer in them for aging-in-place bathrooms. No handle to grip at all, just wave a hand under the sensor. They also cut down on water waste since the faucet only runs while hands are actually under it. The one downside is the battery pack needs replacing every year or two, so I always mount a reminder sticker inside the cabinet door.
For showers, thermostatic mixing valves paired with lever controls give you the same gripping benefit while also preventing scalding, a real risk for anyone with reduced sensation in their hands or feet. I retrofit these into almost every shower remodel now, aging-in-place project or not, because the safety benefit is hard to argue with.
Real Talk: What’s Not Worth It (and What Can Go Wrong)
Not every aging-in-place upgrade is worth your money, and I’d be doing you a disservice if I didn’t say so plainly.
Walk-in tubs are the biggest offender. I know they’re marketed everywhere as the aging-in-place solution, but here’s the problem nobody mentions in the commercials: you still have to step over a wall to get in, then sit and wait for the tub to fill or drain before you can safely stand back up. If a fall happens while that tub is filling, you’re sitting in a locked enclosure with rising water. I’ve had exactly one client love hers, and about six others regret the $10,000 they spent. I’ve found that a curbless shower does everything a walk-in tub promises, minus the risk.
Grab bars installed without blocking are another disaster waiting to happen. I’ve been called in more than once to fix a bar that pulled clean out of the drywall the first time someone leaned on it, sometimes taking a chunk of tile with it. If you’re not opening the wall to install blocking, at minimum use a stud finder and mount directly into studs, not just anchors.
DIY curbless showers without proper slope calculations are the other big mistake I see. Water needs roughly a quarter inch of drop per foot toward the drain, and eyeballing it just doesn’t cut it. I’ve torn out more than one botched curbless shower where standing water sat against the far wall for hours after every use, which is a mold problem waiting to happen, not just an inconvenience.
And one more thing: don’t let a contractor talk you into a total gut renovation if your budget only allows for three or four of these changes. Prioritize the curbless shower, grab bars with proper blocking, and lighting first. Those three alone prevent the vast majority of bathroom falls, and you can phase in the rest over time.
Parting Wisdom
A safe bathroom doesn’t have to look like a medical facility, and it definitely doesn’t have to happen all at once. Start with the changes that protect against falls first, curbless entry, real grab bars, and good lighting, then build out from there as your budget allows. My mother-in-law’s bathroom took eight months from first phone call to final walkthrough, done in stages, and she’s never once complained it looks clinical. If anything, her friends ask where she got that shower tile.
What’s the one change you’re most worried about tackling first, the shower, the toilet height, or something else entirely? Drop your questions or your own aging-in-place horror stories in the comments below. I read every one, and there’s a decent chance I’ve made the same mistake myself.