

Your bathroom is the size of a postage stamp, and you still want a walk-in shower with a bench. I get it. I’ve stood in that exact spot, tape measure in hand, staring at a 36-inch by 60-inch alcove and wondering if I was about to make a very expensive mistake.
Here’s the good news: a small walk-in shower with a bench isn’t a contradiction. It’s one of the most requested upgrades I get asked about, and for good reason. A bench turns a cramped shower from “rush in, rush out” into something that actually feels like a feature in your home, not a chore you tolerate twice a day.
I’ve built these in tiny powder-room-turned-bathrooms, cramped 1970s ranch homes, and a few primary suites where “small” was generous. Some benches I built were genius. Others I ripped out within a year because they collected mold, stole floor space, or just looked clunky. I’m going to walk you through what actually works, what to skip, and how to avoid the headaches I created for myself.
Why a Bench Matters Even in a Small Walk-In Shower
A lot of people assume a bench is a luxury feature reserved for big primary bathrooms. Wrong. In a small shower, a bench does real work.
It gives you a spot to set your foot while shaving. It’s a place to sit if you’ve got bad knees, a bad back, or you’re just exhausted after a 12-hour shift. It’s storage you didn’t know you needed for shampoo bottles, razors, and that loofah nobody else in the house is allowed to touch.
Small walk-in showers with built-in seating also tend to sell better. Realtors and home appraisers consistently flag curbless or low-curb showers with seating as a value-add, especially for buyers thinking long-term about aging in place. You’re not just building a shower bench. You’re building flexibility into your home.
So let’s get into the seven ideas that actually deliver on that promise.
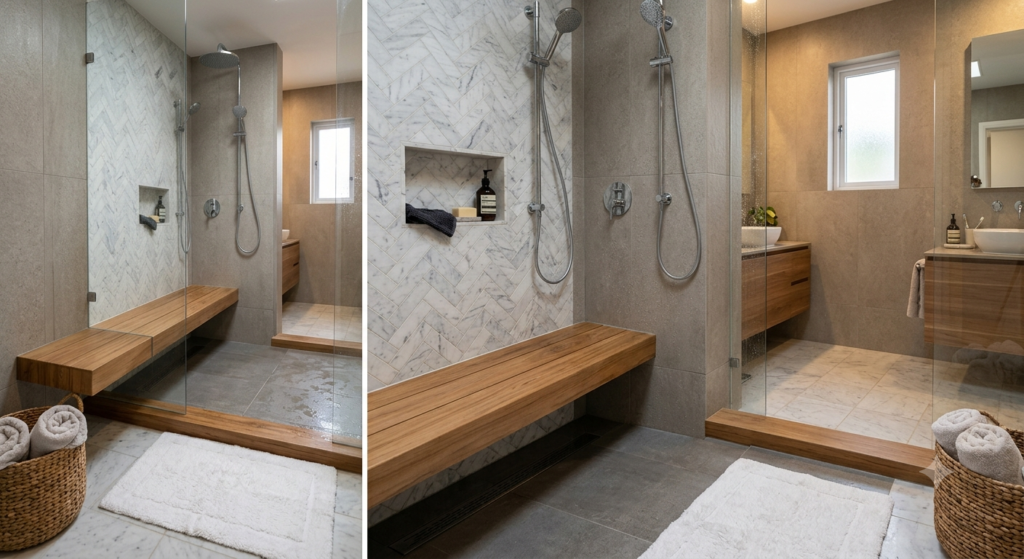
1. The Floating Corner Bench (My Go-To for Tiny Showers)
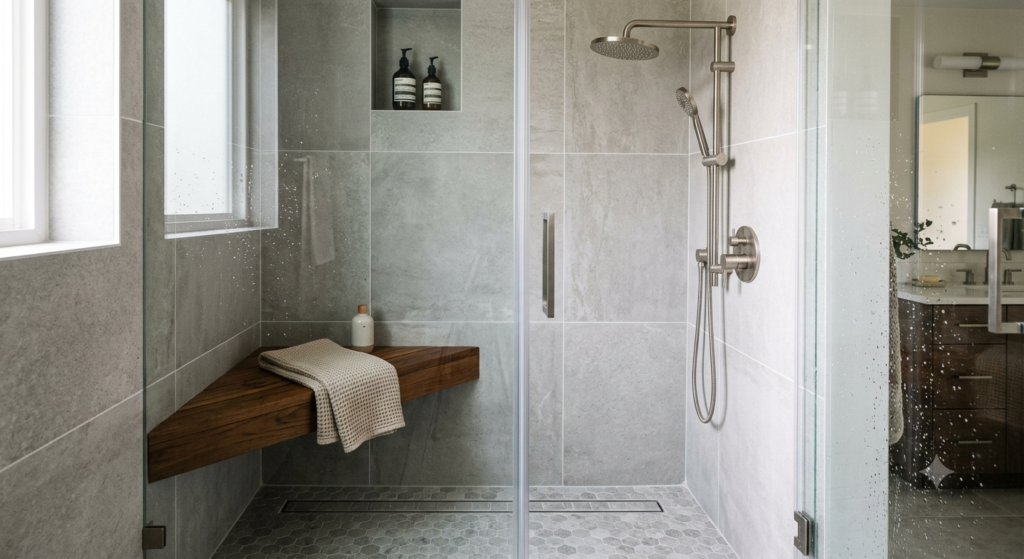
If your shower is tight on square footage, a floating corner bench is probably your best friend. It’s mounted to two walls, hovers a few inches off the shower floor, and takes up almost no visual or physical space.
I installed one of these in a 32-inch by 48-inch shower stall and it completely changed how the room felt. Because the bench floats, light and water can move underneath it, which means less standing water and less mildew creeping into corners.
The trick with floating benches is the blocking. You need solid backing in the wall studs before you tile anything, or that bench is coming down the first time someone sits on it wrong. I learned this the hard way on a guest bathroom remodel where I rushed the framing stage. Three months later, the homeowner called me because the bench had a wobble you could feel through your feet. Don’t skip the blocking step. Ever.
This style works best with a teak or solid-surface seat if you want a removable option, or a tiled cantilevered shelf if you’re going permanent. Either way, keep the depth between 12 and 16 inches. Anything deeper in a small shower starts eating your standing room.
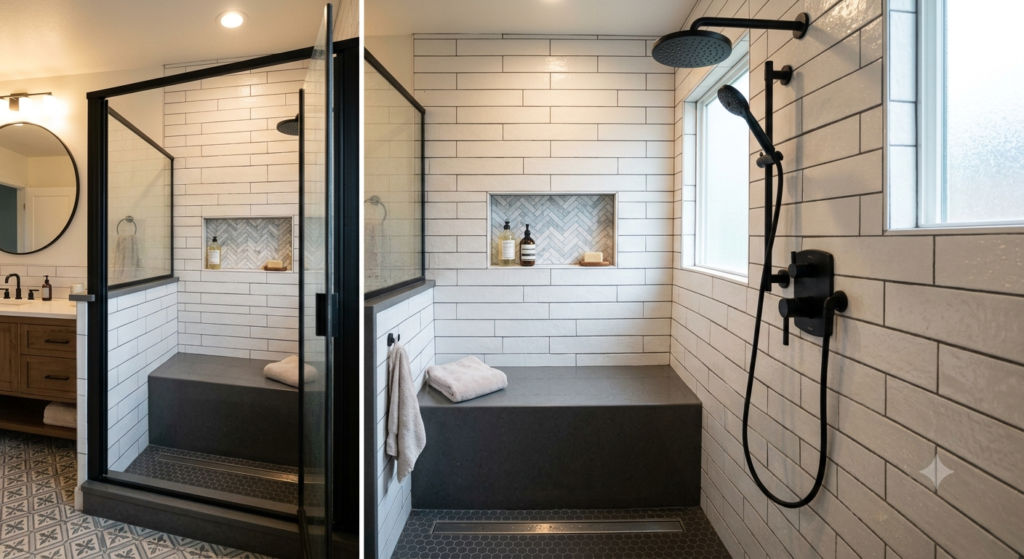
2. The Built-In Tiled Seat (Classic, Permanent, Reliable)
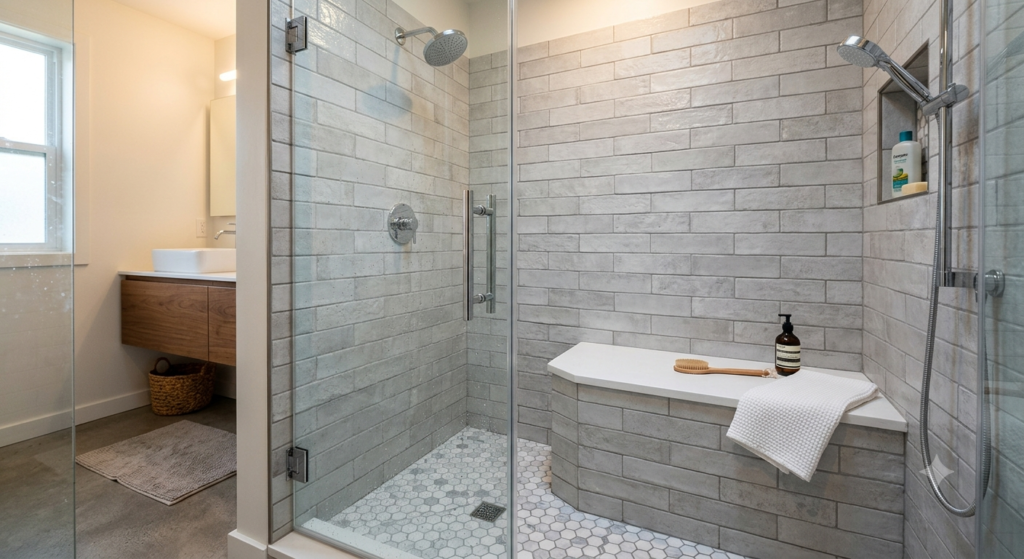
This is the bench most people picture when they search “small walk-in shower with bench ideas.” It’s a solid, tiled seat built directly into the shower wall, usually running the width of one end of the shower.
I like this option for small bathrooms because it pulls double duty as both a seat and a visual anchor. Tile it to match your shower walls and it disappears into the design. Tile it in a contrasting material, like a honed marble or a textured porcelain, and it becomes the focal point of the whole room.
The biggest mistake I see DIYers make here is skipping the slope. Your bench needs a slight pitch, about a quarter inch per foot, toward the shower drain. Without it, water pools on the seat and you’ll be scrubbing soap scum off a flat surface every single weekend. I’ve found that a lot of online tutorials gloss over this detail completely, and it’s the number one reason people end up unhappy with their built-in bench.
Built-in seats also need proper waterproofing membrane underneath, not just on top. If you’re hiring this out, ask your contractor directly what waterproofing system they’re using under the bench, not just on the walls. This is where corners get cut, and it’s the kind of mistake you won’t see until there’s a stain on your ceiling below.
3. The Drop-Down Folding Bench (Best for Truly Tiny Spaces)
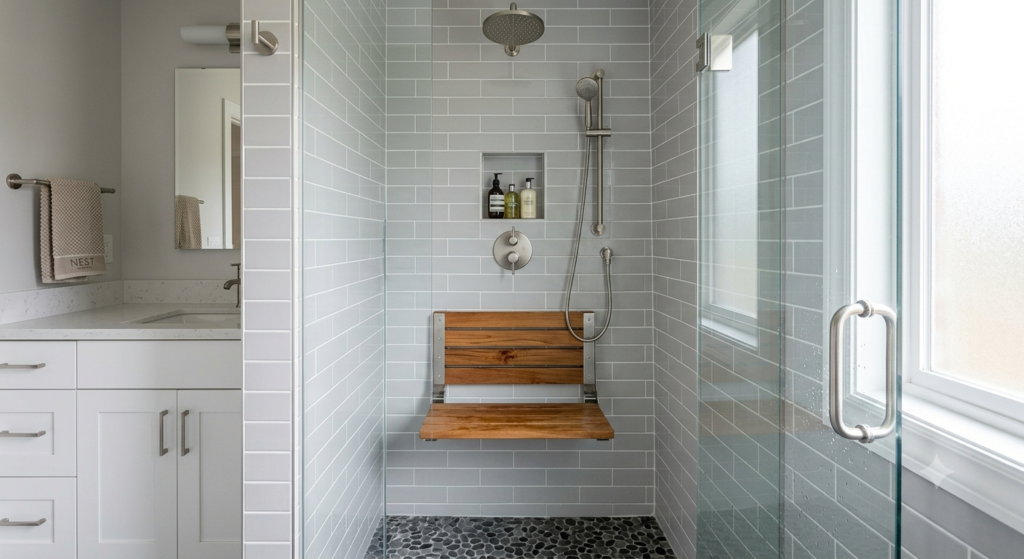
If your shower is so small that any permanent seat feels like a hazard, a drop-down folding bench is the answer. These mount flush against the wall and fold up when you don’t need them, basically giving you back your floor space on demand.
I put one of these into a basement bathroom remodel where the shower was barely big enough for one adult to turn around in. The client wanted seating for shaving legs and resting during longer showers, but there was zero room to spare. The folding bench solved it without making the shower feel smaller.
Most of these come in teak, stainless steel, or a powder-coated aluminum frame with a slatted seat. Teak looks the nicest, but it needs occasional oiling to keep from graying out. If you want a “set it and forget it” option, go stainless or aluminum.
One quick side note: these benches usually have a maximum weight rating between 250 and 300 pounds. Always check that spec before you buy, especially if more than one person in the household will be using it. I’ve seen people assume all wall-mounted hardware is rated the same, and it absolutely is not.
4. The Niche-and-Bench Combo (Maximizing Every Inch)
This one’s sneaky smart. Instead of building a separate bench and a separate shower niche for your shampoo and soap, you combine them into one structure. The bench sits below, the niche is built into the wall right above it, often at a height where you can reach products without leaning far.
I used this layout in a small hall bathroom where every single inch of wall space mattered. By stacking the bench and the storage niche, we avoided cutting into a second wall cavity, which kept the plumbing and framing simpler and saved real money on labor.
The design benefit is just as good as the practical one. A niche and bench combo reads as one intentional design element instead of two separate afterthoughts. Tile them in the same material, maybe add an accent strip of glass or mosaic tile inside the niche, and you’ve got a built-in feature wall in a shower that’s maybe five feet wide.
If you’re framing this yourself, plan your niche depth carefully. You want at least 4 inches of depth for the niche, but you also need to confirm there’s no plumbing or electrical running through that wall cavity before you start cutting. I always recommend a stud finder pass and, if you’re not sure, a quick check with a contractor before demo day.
5. The Bench-as-Threshold (For Curbless or Low-Curb Showers)
This is a more advanced idea, but it’s becoming one of the most searched-for small bathroom shower trends, especially for anyone planning ahead for aging in place or just wanting a sleek, modern look. Instead of a separate curb and a separate bench, the bench extends from the back wall and partially functions as a low entry point or transition zone.
I’ll be honest, this one takes a skilled tile setter and a contractor who actually understands proper slope and waterproofing in curbless designs. This is not a confident-beginner DIY project. I tried something close to this on my own primary bathroom years ago, underestimated the slope calculations, and ended up with water creeping toward my bedroom carpet. Not my finest afternoon.
But when it’s done right, this style gives you a walk-in shower that feels completely open, with seating built right into the architecture instead of bolted on as an extra piece. It works particularly well in small bathrooms because it removes visual clutter. No separate curb, no separate bench silhouette, just one continuous line.
If you’re set on this look, budget extra for a linear drain system and a waterproofing contractor who has specific curbless shower experience. Don’t let anyone talk you into “winging it” with standard pan liner techniques. The standards are different for a reason.
6. The Compact L-Bench for Corner Showers

Corner showers are common in small bathrooms because they make smart use of an awkward layout, usually tucked next to a vanity or toilet. An L-shaped bench wraps around the corner of the shower itself, giving you more seating length without eating into your turning radius the way a straight bench would.
I built one of these in a 1940s bungalow renovation with a genuinely odd-shaped bathroom. The L-bench let the homeowner sit comfortably with their legs extended, something a straight 16-inch bench just can’t offer in a tight space.
The key here is proportion. Your L-bench legs shouldn’t both be full-depth. I usually build one leg around 16 inches deep for sitting and the other leg around 8 to 10 inches deep, just enough for a foot prop or to set a bottle of conditioner. Two full-depth legs in a small shower will make the whole stall feel like an obstacle course.
Material-wise, this style loves a solid-surface or quartz bench top because the corner seam needs to be water-tight and visually clean. Tile can absolutely work too, but you’ll want mitered corner pieces instead of a basic butt joint, or that seam becomes a grout-cracking headache within a couple of years.
7. The Teak Slat Bench (Freestanding, Flexible, Forgiving)
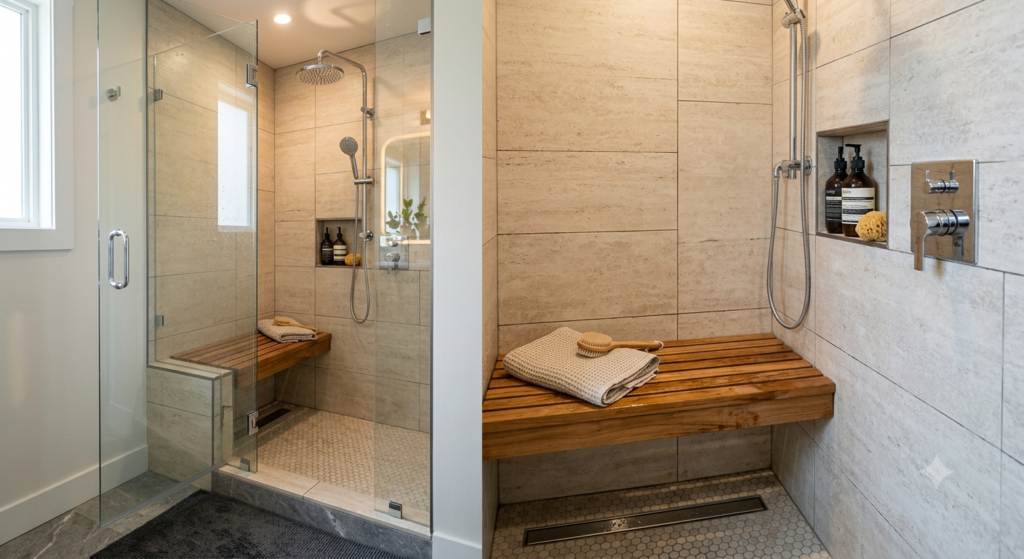
Sometimes the smartest small walk-in shower bench idea is the one that isn’t permanently attached to anything. A freestanding teak slat bench gives you all the function of built-in seating with none of the framing, waterproofing, or tile-slope stress.
I recommend this option constantly to people doing a shower remodel on a tight budget or a tight timeline. You don’t need to touch the plumbing, the studs, or the waterproofing membrane. You set the bench in, and you’re done.
Teak is naturally water and rot resistant, which matters because this thing is going to live in a wet environment full time. The slats also let water drain straight through instead of pooling, which solves the mold problem that flat built-in benches sometimes create if the slope isn’t perfect.
The trade-off is floor space. A freestanding bench takes up actual square footage on your shower floor instead of hovering on a wall, so measure twice before you buy one. I’ve found an 18-inch by 14-inch teak bench works in most small showers without making things feel cramped, but always do a dry test with painter’s tape on your actual shower floor before committing.
Real Talk: What Can Go Wrong, and What’s Not Worth It
Let’s slow down for a second, because not every bench idea deserves a spot on your Pinterest board.
Skipping the slope on a built-in bench is the single biggest mistake I see. It seems like a tiny detail until you’ve got standing water and soap scum baked into the grout six months later. If your contractor brushes off your question about slope, find a different contractor.
Oversized benches in undersized showers are a total waste of money, even when they look gorgeous in a showroom. I’ve ripped out two benches over the years simply because they were too deep for the stall and made every shower feel like a balancing act. Measure your actual usable floor space, not just the stall dimensions, before picking a bench style.
Cheap wall-mounted folding benches with plastic brackets are not worth the savings. I had one fail on a client within eight months because the bracket hardware corroded in the constant moisture. Spend the extra money on stainless steel or solid teak hardware. Your future self will thank you.
Curbless bench-as-threshold designs are not a beginner DIY project. I mentioned my own flooding mishap earlier, and that was after a decade of hands-on experience. If you’re not deeply comfortable with slope calculations and waterproofing membranes, hire this part out. It’s the one area where I genuinely think DIY pride isn’t worth the risk to your subfloor.
And one more thing nobody talks about: niches and benches built into exterior walls in cold climates need extra insulation consideration. I’ve seen condensation issues develop behind tile in poorly insulated exterior wall benches, especially in older homes. Always check which walls are exterior before you finalize your bench placement.
Final Thoughts
A small walk-in shower with a bench isn’t about cramming in a feature because it’s trendy. It’s about picking the right style for your actual square footage, your budget, and how much DIY risk you’re genuinely comfortable taking on. I’ve made plenty of mistakes building these over the years, mostly from rushing the prep work because the fun part, picking tile and finishes, always feels more exciting than checking blocking and slope. Don’t make my mistake. The boring stuff is what makes the pretty stuff last.
Which one of these bench styles fits your bathroom best? Drop your shower dimensions in the comments below, and I’ll tell you honestly which idea I’d actually build if it were my house.