

My neighbor Carol called me in a panic last spring because her shower door had come off its hinges for the third time in two years. She was tired of squeegeeing glass every morning, tired of the rubber seal growing that weird pink mold, and tired of her kids slamming the door so hard it rattled the whole bathroom. She asked me one question: “Can I just… not have a door?”
Yes. Yes, you absolutely can.
I’ve remodeled more bathrooms than I can count on two hands, and the doorless shower trend isn’t just a Pinterest fantasy. It’s practical, it’s easier to clean, and it makes small bathrooms feel twice as big. But there’s a right way and a wrong way to pull it off, and I’ve made plenty of mistakes finding the right one.
Here are 7 doorless walk-in shower ideas that hold up in real life, not just in a glossy magazine spread.
1. The Curbless Wet Room (Best for Small Bathrooms)
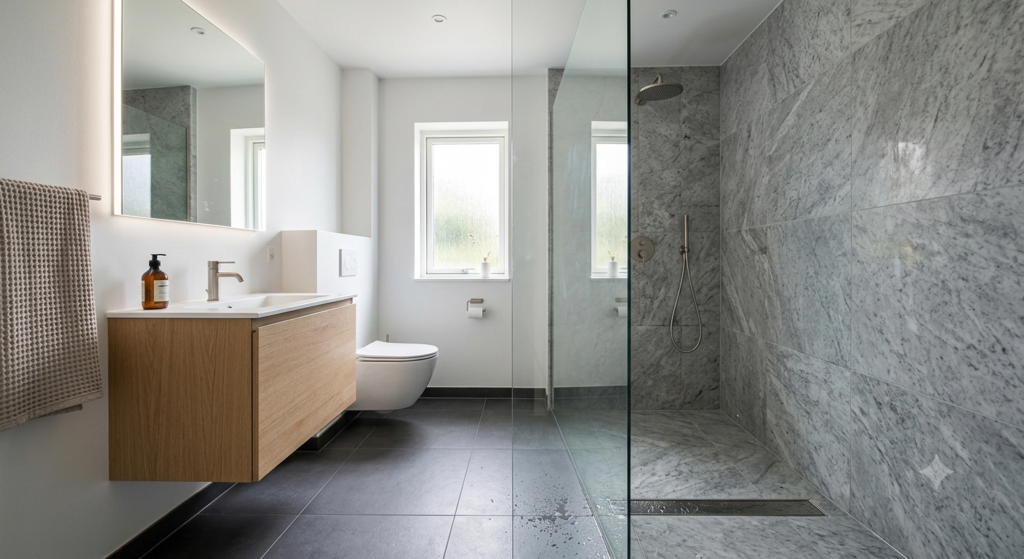
A curbless wet room means the entire bathroom floor slopes gently toward a drain, and the shower area has no raised lip, no curb, and no barrier at all. The whole room basically becomes the shower.
I redid my own guest bathroom this way two years ago, and it’s still my favorite project in the house. The floor tile runs straight from the vanity into the shower zone without a single trip hazard. My mother-in-law, who has a bad hip, can walk in without lifting her foot over anything. That alone makes this worth considering if you’re remodeling for aging in place.
The trick is in the slope. You need a slope of about 1/4 inch per foot toward the drain, and honestly, this is not a DIY-on-a-Saturday job unless you’re experienced with a notched trowel and a level. I tried eyeballing a slope once on a smaller project and ended up with a puddle that pooled by the toilet. Not my finest hour.
Search terms people use for this: “curbless shower bathroom remodel,” “zero threshold shower,” “wet room ideas small bathroom.” If your contractor doesn’t know these terms, that’s a red flag. Ask specifically about a “linear drain wet room” so you’re both speaking the same language.
2. The Pony Wall Shower (Privacy Without a Single Hinge)
A pony wall is a short, half-height wall, usually 36 to 42 inches tall, that blocks water spray without enclosing the whole shower. Think of it as a privacy screen that doubles as a place to set your shampoo.
I built one of these in my own primary bathroom and I’m opinionated about it: this is the best option if you share a bathroom with kids who need water contained but you don’t want the claustrophobic feeling of full glass walls. The wall blocks the spray at the source, which is the entry point, so water never even gets the chance to wander.
You can cap the pony wall with a wood ledge, a slab of quartz, or even a stacked stone cap if you want a spa look. I went with a thin porcelain cap because it matches my floor tile and never stains. That’s a small detail, but it’s the kind of thing that makes a bathroom look intentional instead of thrown together.
Searches that pull up this idea: “half wall shower no door,” “pony wall walk-in shower design,” “open concept shower wall ideas.” A lot of remodeling blogs lump this in with “European shower” styling, which is just a fancier way of saying the same thing.
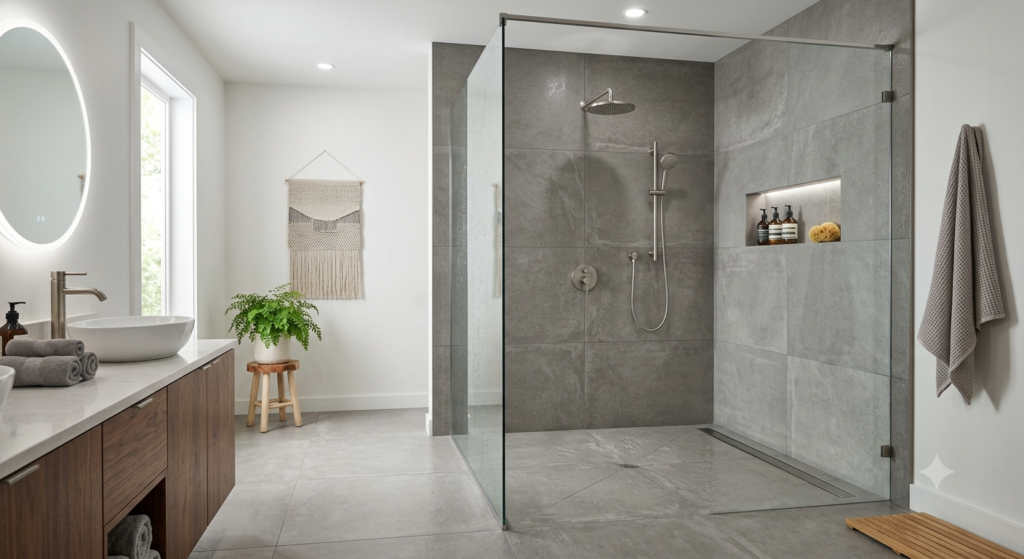
3. The Single Fixed Glass Panel (My Go-To Recommendation)
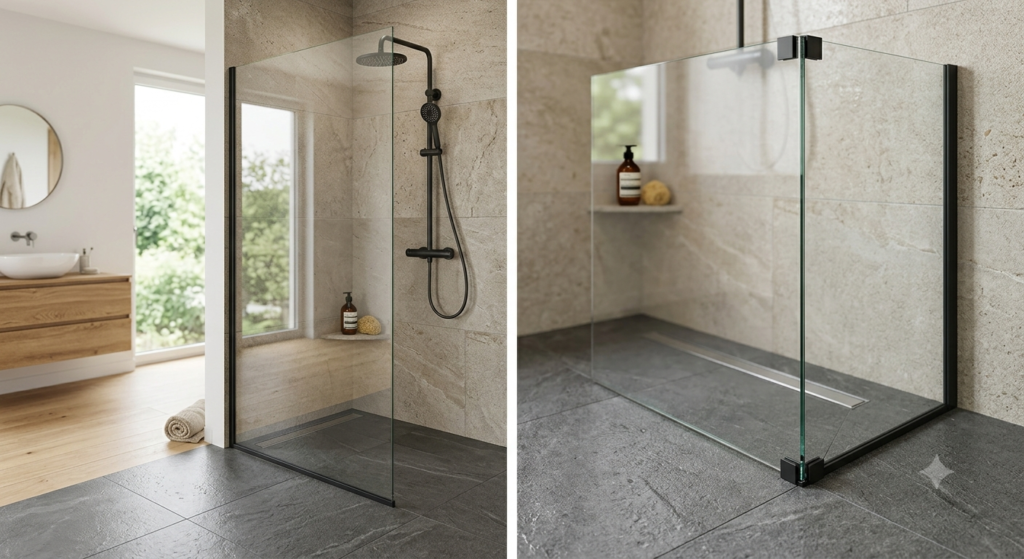
This is the one I recommend to almost every client now: one fixed, frameless glass panel positioned at the entry, with no swinging door attached to it at all. Water hits the panel and redirects back into the shower zone instead of soaking your bathroom floor.
I’ll be opinionated here too: I think full glass enclosures with sliding doors are a total waste of money for most households, even though they look pretty in a showroom. The tracks collect soap scum, the rollers eventually squeak, and you’re cleaning two pieces of glass instead of one. A single fixed panel gives you 80 percent of the water protection with about 20 percent of the cleaning hassle.
Size matters here. A panel between 28 and 36 inches wide is usually enough to block spray from a standard shower head positioned correctly. If your shower head is on the same wall as the entry, you might need it wider, or you might need to relocate the shower head, which is a plumbing job worth hiring out.
People search this as “fixed glass panel shower no door,” “frameless shower panel walk in,” or “shower splash guard glass.” Show your contractor a picture if you can, because “splash panel” and “shower screen” sometimes get confused with full sliding enclosures in catalogs.
4. The Recessed Alcove Shower (No Walls Needed at All)

If your shower sits inside a recessed alcove, meaning it’s tucked between three existing walls, you might not need any glass, curb, or door whatsoever. The architecture itself does the privacy work.
This only works if the entry side faces away from the rest of the bathroom, like down a short hallway or around a corner. I did this in a basement bathroom where the shower sat in a little nook under the stairs. No glass, no curb, just tile that wrapped from the floor up the walls and a drain in the floor. It’s the cheapest doorless option on this list because you’re not buying any hardware at all.
The catch is water control. Without a curb or glass, you’re relying entirely on your shower head’s spray pattern and the slope of your floor. I always recommend a rain-style shower head pointed straight down rather than an angled head for these layouts, because angled spray will absolutely find its way out and onto your bath mat.
If your bathroom layout doesnn’t naturally have a recessed nook, don’t force this one. I’ve seen people try to fake an alcove with a half wall that’s too short, and the water just goes right over it. Search “shower alcove no door” or “recessed shower design ideas” to see real layouts before you commit.
5. The Frameless Glass Wing Wall
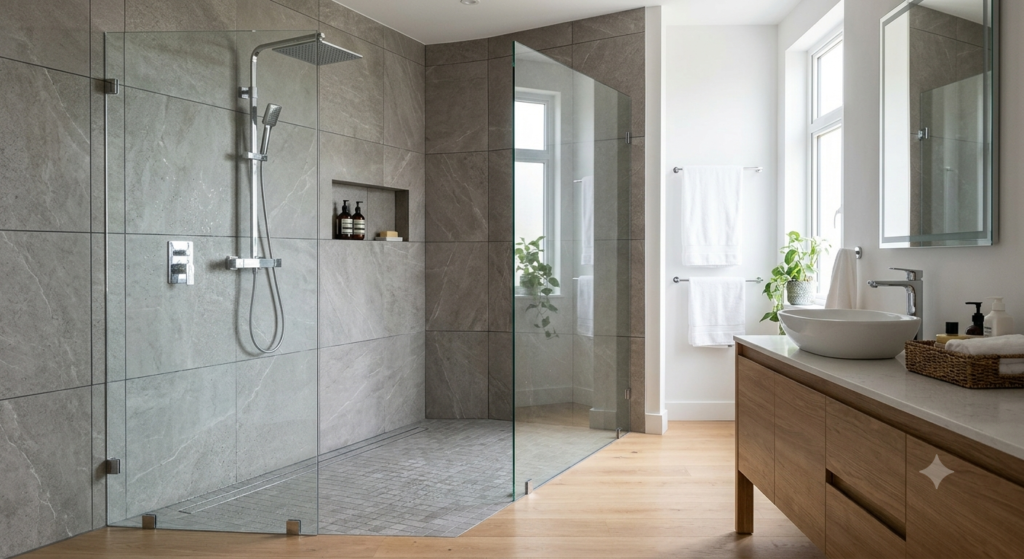
A wing wall is a single, tall pane of glass attached perpendicular to the shower wall, basically standing guard at the entrance like a glass bookend. No door, no track, no hinges. Just one clean panel.
This is the most “modern farmhouse meets spa hotel” look you can get, and I’ve installed these in three different remodels now. Clients love it because it photographs beautifully for resale listings, and frankly, it does. There’s something about a single sheet of glass with a black metal channel at the floor that makes a bathroom look custom-built even on a moderate budget.
The installation needs a solid mounting point, either a metal channel set into the tile or a clip system bolted to the wall. I’d never recommend the cheap suction-style panels you sometimes see online. They’re not rated for daily shower use and they will eventually slip, usually at the worst possible moment.
This idea ranks well under searches like “glass wing wall shower,” “frameless shower panel no door,” and “modern walk-in shower glass divider.” If your tile guy hasn’t installed a channel-mounted panel before, get a second quote from someone who has. This is not the spot to let someone learn on the job.
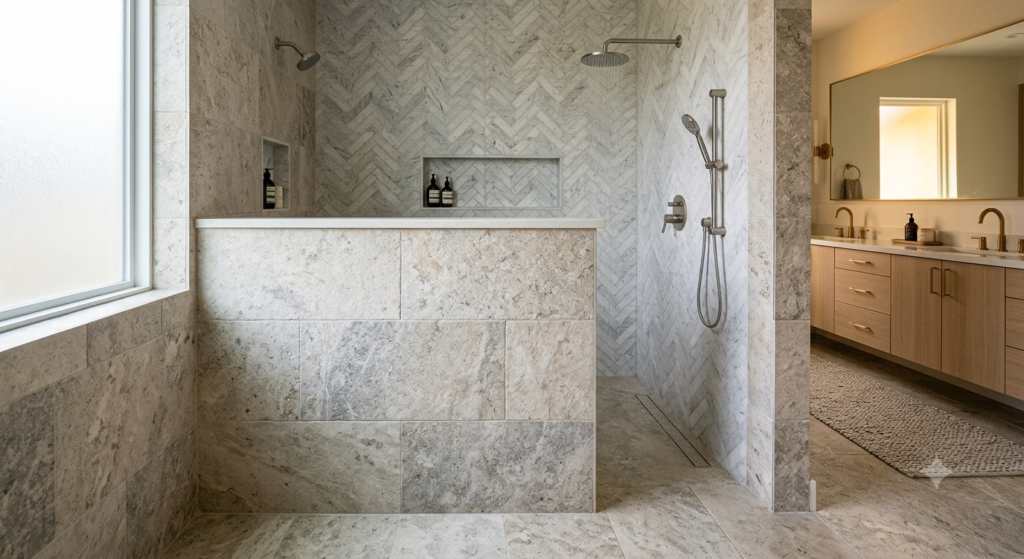
6. The Linear Drain Walk-In with Large Format Tile
This idea is less about the barrier and more about the floor doing all the heavy lifting. A linear drain runs along one edge of the shower instead of a single drain in the center, which lets you slope the entire floor in one direction instead of four. That single-direction slope is what makes large format tile, the big 24×24 inch slabs everyone wants right now, actually possible in a shower.
I switched from center drains to linear drains on every doorless project I do now, no exceptions. With a center drain, you need four slopes meeting at one point, which means more grout lines, more potential leak points, and tile that has to be cut into little pie shapes near the drain. With a linear drain, the big tile sits flat across one continuous slope. Fewer seams means fewer places for water and grime to hide.
The other underrated perk is how it looks. A long, narrow drain slot tucked against the wall almost disappears visually. Compare that to a round drain sitting in the middle of your shower floor, which honestly looks a little dated next to all that big, clean tile.
This is searched as “linear drain shower,” “large format tile shower floor,” and “curbless shower drain ideas.” If your plumber pushes back and says a center drain is easier, that’s true, it is easier for them. It’s just not the better long-term choice for a doorless layout.
7. The Budget Curtain-on-a-Curve Option
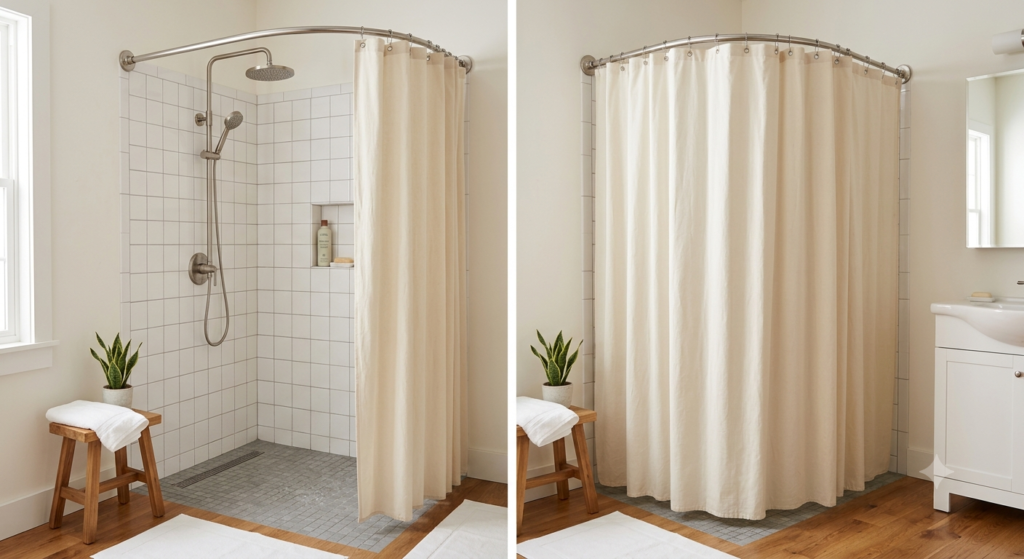
I’m tossing this one in as a bonus because it’s not glamorous, but it’s honest, and I’d be lying if I said it didn’t work. A curved shower rod with a heavy-duty fabric curtain, hung well outside the wet zone, gives you flexible water containment with zero installation cost beyond the rod itself.
This is the right call if you’re renting, if you’re testing out a doorless layout before committing to glass, or if your budget got eaten alive by a surprise plumbing issue, which happens to literally everyone at some point in a remodel. I used a curved rod setup in my first apartment, and while it’s not the spa look of the other six ideas, it kept water off my bathroom floor for three years without a single complaint.
Get a curve, not a straight rod, because the curve bows outward and gives you extra elbow room, plus it billows less against your skin while you shower. A weighted hem on the curtain also keeps it from flapping into the wet zone with the airflow from your bathroom fan.
This won’t win you any design awards, and I’d treat it as a placeholder rather than a permanent solution, but if someone tells you doorless showers always require a big budget, that’s just not true.
Real Talk: What Can Go Wrong With Doorless Showers
I want to be straight with you about the downsides, because plenty of articles skip this part.
Water escapes more than you’d think. Even with a great layout, some splash will find its way past a half wall or panel, especially if more than one person uses the bathroom with different shower head heights. Budget for a bath mat strategy, not just a beautiful tile job.
Heat loss is real in cold climates. A fully enclosed shower traps steam and warmth. A doorless shower lets that heat wander into the rest of the bathroom. If you live somewhere cold, consider a heated floor or at least keep your expectations realistic about how toasty your shower will feel in January.
Slope mistakes are expensive to fix. Once tile is set on an incorrect slope, you’re not patching it. You’re ripping it out. This is the single most common doorless shower failure I’ve seen, and it almost always traces back to someone rushing the waterproofing membrane or skipping a pre-slope layer entirely.
Not every layout supports it. If your shower head sits directly across from your bathroom door, or your ceiling height is unusually low, a doorless setup might fight you the whole way. I’ve talked at least a dozen clients out of going doorless because their layout would have meant water hitting the vanity mirror every single morning.
Resale buyers aren’t always on board. I love doorless showers, but I’ve had a few clients tell me their real estate agent flagged it as a “love it or hate it” feature for resale. If you’re remodeling specifically to sell soon, get your agent’s take before you commit.
Final Thoughts (And a Question for You)
A shower door isn’t a requirement, it’s a habit we picked up because that’s what showers have always looked like. Once you let go of that assumption, you’ve got a lot more room, literally and figuratively, to design something that actually fits how you live.
My honest advice: pick the idea on this list that matches your layout first, then worry about how it looks. A gorgeous glass wing wall means nothing if water ends up on your bathroom floor every single day.
Which one of these are you leaning toward, or did your bathroom layout throw you a curveball I didn’t cover here? Drop your questions or your own doorless shower disasters in the comments below. I read every one, and I’d genuinely love to help you troubleshoot before you pick up a single tile.