
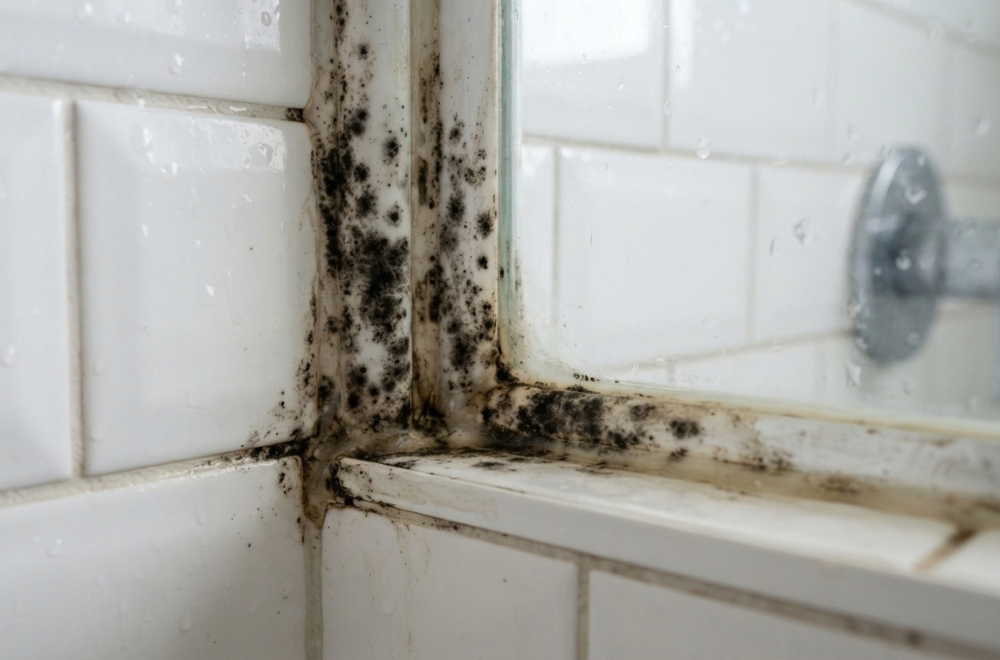
Black spots along a shower’s silicone bead behave in one of two ways. Some wipe away with a sponge and stay gone. Others fade after a good scrub, look clean for a week, and return in the same places. The difference usually comes down to where the mold is growing: on the surface of the sealant, or inside it.
Cleaning works on the first kind. The second kind means the silicone has to be cut out and replaced, and no amount of scrubbing changes that. The steps below cover how to tell which one you have, how to clean surface growth without wrecking anything, how to replace the bead properly, and how to keep it from coming back.
Why Some Black Spots Wipe Off and Others Never Do
Cured silicone is non-porous. Mold has nothing to eat in the silicone itself, so it lives on what collects on top of it: soap residue, body oils, shampoo film, and mineral deposits from hard water. Add warmth, a daily dose of moisture, and a bathroom that stays damp for hours, and a thin biofilm forms along the bead, which sits in a slight groove where water lingers.
Surface growth like this is the easier case. Break up the film, treat the mold, and the silicone underneath is usually fine.
Trouble starts when the sealant has aged. Silicone shrinks and hardens slightly over the years. Hairline cracks open, the edge lifts from the tile or tub, and water gets into the gap. Mold then grows in the crack, along the bond line, and sometimes on the back of the bead where you can’t see it. Some sealants, especially the cheaper “siliconized acrylic” products sold as bathroom caulk, are also less resistant to staining than 100% silicone, so dark discoloration can go deeper into the material.
Most silicones made for kitchens and bathrooms contain a mildew-resistant additive. It slows growth but doesn’t last forever, and it does nothing against a constant film of soap scum.
Confirm It’s Mold Before You Start
Dark marks on a sealant line aren’t always mold. Dirt, soap scum, and water staining can all look similar. There’s also a difference between pink or orange slime, which is commonly bacterial growth and wipes off easily, and black or dark green fuzzy spots, which are more likely mold.
A rough field test: dab a little diluted household bleach (about one part bleach to ten parts water) on a small, inconspicuous spot. If it lightens within a minute or two, it’s almost certainly mold or mildew. If nothing changes, the stain may be dirt, or it may be pigment that has soaked into the sealant. That’s not a lab identification, just enough to decide how to proceed.
Then look for signs the problem is bigger than the surface:
- The silicone is peeling away from the tile or tub, even slightly
- There are cracks, splits, or a gap you can slide a fingernail into
- The bead feels soft, sticky, or crumbly rather than firm and rubbery
- The wall near the joint feels spongy, or the grout is powdery
- The bathroom smells musty even after cleaning
Peel back a small piece of the bead at a corner. If the underside is black, or the tile edge behind it is dark and damp, cleaning the top won’t help.
One more point on health: the color doesn’t tell you the species. “Black mold” gets used as shorthand for a dangerous type, but many molds look dark, and you can’t identify one by eye. Health agencies such as the CDC generally advise removing visible mold regardless of type rather than trying to identify it. Treat all of it the same way.
Set Up Before You Scrub
Have these ready before you open any bottle:
- Rubber or nitrile gloves (long ones if you’re working overhead)
- Safety glasses, since spray and drips end up in eyes more often than people expect
- A window open and the exhaust fan running
- A soft-bristled brush or an old toothbrush, plus a non-scratch sponge
- Microfiber cloths and a spray bottle of clean water for rinsing
- A dust mask or N95 if you’ll be scrubbing a lot of growth, since scrubbing sends spores into the air
People with asthma, mold allergies, or weakened immune systems should hand this job to someone else. Keep children and pets out of the bathroom until it’s rinsed and aired out.
The most important rule is about chemicals: don’t combine cleaners. Bleach mixed with ammonia or with acids such as vinegar releases toxic gases. Some toilet bowl cleaners, drain cleaners, and rust removers are also acidic and shouldn’t meet bleach. Even hydrogen peroxide and vinegar shouldn’t be blended in one bottle, because the combination forms peracetic acid, which is corrosive and irritating. If you use more than one product, use them separately. Rinse the area thoroughly with water and let it dry before the next one.
The EPA’s guidance for mold in homes suggests that small areas, roughly 10 square feet or less, are usually manageable for a homeowner. A stretch of shower caulk is well below that. Larger growth on walls or ceilings is a different situation, covered near the end of this article.
Start With Soap Scum, Not Bleach
This is the step people skip, and it’s the reason some cleaning attempts fail. Mold sits in a film of soap residue. Bleach reacts with organic residue and gets used up before it reaches what’s underneath, so spraying it straight onto a scummy bead is partly wasted.
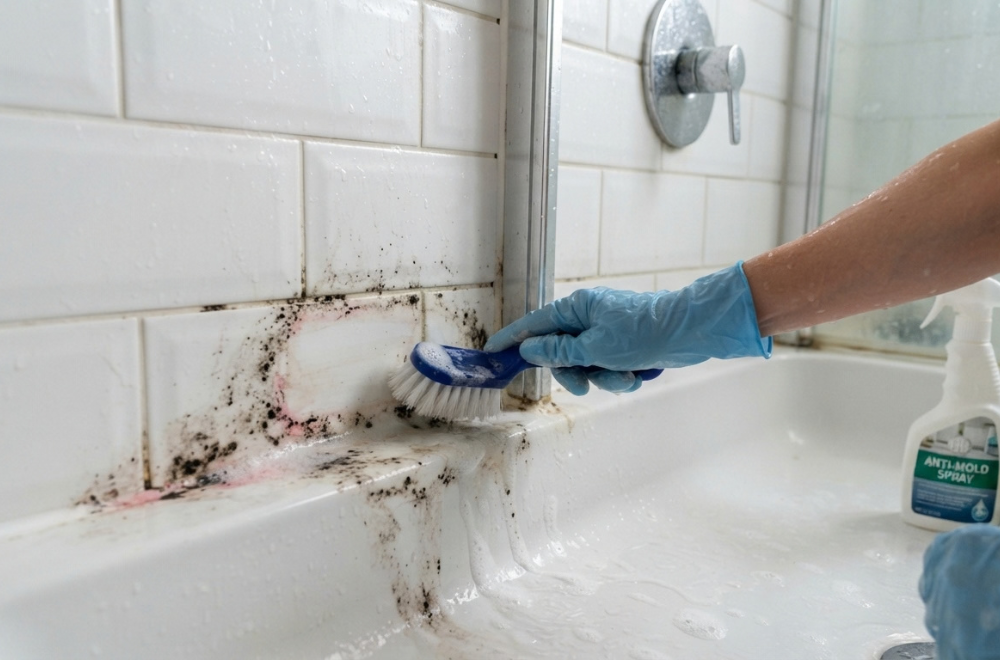
Wash the bead first with warm water and a squirt of dish soap or a bathroom cleaner meant for soap scum. Work along the line with a soft brush. Rinse. You’re removing the film, not killing the mold yet, but you’ll often see the dark spots lighten noticeably, and the next treatment can make direct contact with the mold itself.
Avoid steel wool, abrasive powders, and stiff scrub pads. Fine scratches in silicone give mold and soap scum more surface to cling to.
Which Cleaner to Use, and When
There are five common options. They aren’t interchangeable, and the right one depends mostly on how dark the stain is and what surrounds the silicone.
| Cleaner | Best for | Typical contact time | Watch out for |
| Baking soda paste | Light films and fresh spots | Scrub right away | Mild abrasive that lifts growth but doesn’t reliably disinfect |
| White vinegar (undiluted, about 5% acidity) | Light surface growth with mineral buildup | 30–60 minutes | Etches marble, limestone, and travertine; never combine with bleach |
| 3% hydrogen peroxide | Moderate staining, and a safer choice near stone | 10–30 minutes | Can lighten colored materials; don’t mix with vinegar in one bottle |
| Diluted household bleach | Stubborn dark stains on white or clear silicone | About 10–15 minutes, then rinse | Fumes, fading colored silicone, harm to some metal fixtures |
| Commercial mold-removing gel | Vertical lines and deep stains | Follow the label | Check that it suits your surfaces; ventilate well |
A few notes on how to choose.
If the shower has natural stone tile or a stone surround, skip vinegar. Acids etch marble, limestone, and travertine, leaving dull patches that can’t be cleaned away. Peroxide is the better first choice.
Vinegar’s record against mold is mixed. It isn’t sold or registered as a disinfectant, and it works best as a cleaner on light growth. It’s useful when you’d rather avoid bleach, but don’t expect it to fix a deep stain.
Bleach is the strongest option for dark staining, which is why it’s so widely recommended. The CDC’s guidance for cleaning hard surfaces caps the mix at no more than 1 cup of household laundry bleach per gallon of water. Stronger is not better. It only adds fumes and raises the odds of damaging fittings. Bleach can also fade colored or tinted silicone, so test a hidden spot first if yours isn’t white or clear. Keep it off chrome and other metal trim, and rinse any splashes right away.
Gels earn their price on vertical joints. A thin liquid runs down the wall before it does any work, and a gel stays where you put it. The label will tell you how long to leave it and what it shouldn’t touch.
A sensible order for most bathrooms: clean off the scum, try hydrogen peroxide or vinegar (whichever suits your surfaces), and only move to diluted bleach or a gel if dark spots remain after that first round.
Keeping the Cleaner in Contact With a Vertical Bead
Spraying a cleaner on a bead running down a wall or along a tub edge accomplishes very little, because most of it drips off within seconds. Mold treatment depends on contact time, so the goal is to hold the product against the silicone.
- Cut strips of paper towel or cotton pads long enough to cover the stained section.
- Soak them in your chosen cleaner, wring out lightly so they don’t drip, and press them along the bead.
- Leave them for the recommended time. For a horizontal joint at the tub edge, the strips will mostly stay put. On walls, a fine mist of the cleaner every few minutes keeps them damp and helps them stick.
- Remove the strips and scrub lightly with a soft brush.
- Rinse with clean water, wipe dry, and let the bathroom ventilate.
Bleach is the exception to the “wait and see” approach. Don’t leave it for longer than the label or the 10–15 minute range suggests, and don’t let it dry on the surface.
How to Tell Whether It Worked
Judge the result the next day, once the silicone has dried. Wet silicone always looks darker.
If the bead is clean and white or clear again, you’re done, and prevention (below) is what matters now. If faint gray shadows remain but nothing looks fuzzy, you can repeat the treatment once. If the black spots are still there after two rounds, or they come back within a couple of weeks even though the bathroom is kept dry, the stain is embedded in the silicone or the mold is growing behind it. More cleaning won’t fix that.
When the Silicone Has to Come Out
Replacement is the right call when any of these are true:
- Black spots survive two proper treatments
- The mold returns quickly after each cleaning
- The bead is cracked, peeling, shrunken, or no longer bonded to the surface
- The underside of the bead is black when you peel a corner back
Don’t run a fresh bead over the old one. New silicone bonds poorly to old silicone, and it seals mold inside the joint, where it can keep growing unseen. The old bead has to be removed completely.
Removing the Old Bead
Score along both edges of the bead with a sharp utility knife, keeping the blade angled away from the tile to avoid scratching the glaze or the tub surface. A plastic scraper or a dedicated caulk-removal tool is safer on acrylic and fiberglass tubs, where metal blades leave marks. Pull the bead out in strips. Silicone often peels away in long pieces once you’ve lifted an end.
What’s left behind is a thin film of silicone residue, and this is where most replacements fail. Sealant won’t stick well to residue. Remove it with a silicone-residue remover or by scrubbing with isopropyl alcohol on a rag until the surface feels bare and slightly squeaky. Follow the product’s instructions for whatever solvent you use, and ventilate while you work.
Then clean the joint itself, removing any mold, soap scum, and dust. If the tile edge or the gap looks dark, treat it with a mold cleaner of your choice, rinse, and dry.
This is also the moment to check your corners. Joints where two walls meet, or where a wall meets a tub, move slightly as the building shifts and the tub expands and contracts. Flexible sealant handles that movement. Rigid grout in those spots cracks, and water then gets behind the tile. If yours are grouted, they’re candidates for a flexible sealant.
Let the Joint Dry Completely
Moisture trapped under fresh silicone is a common reason new beads grow mold within months. After cleaning, let the joint dry for at least 24 hours, longer if the bathroom is humid or the joint was soaked. A hairdryer on low heat and an open window speed things up. A dry paper towel pressed into the gap should come away with no dampness at all.
Applying the New Bead
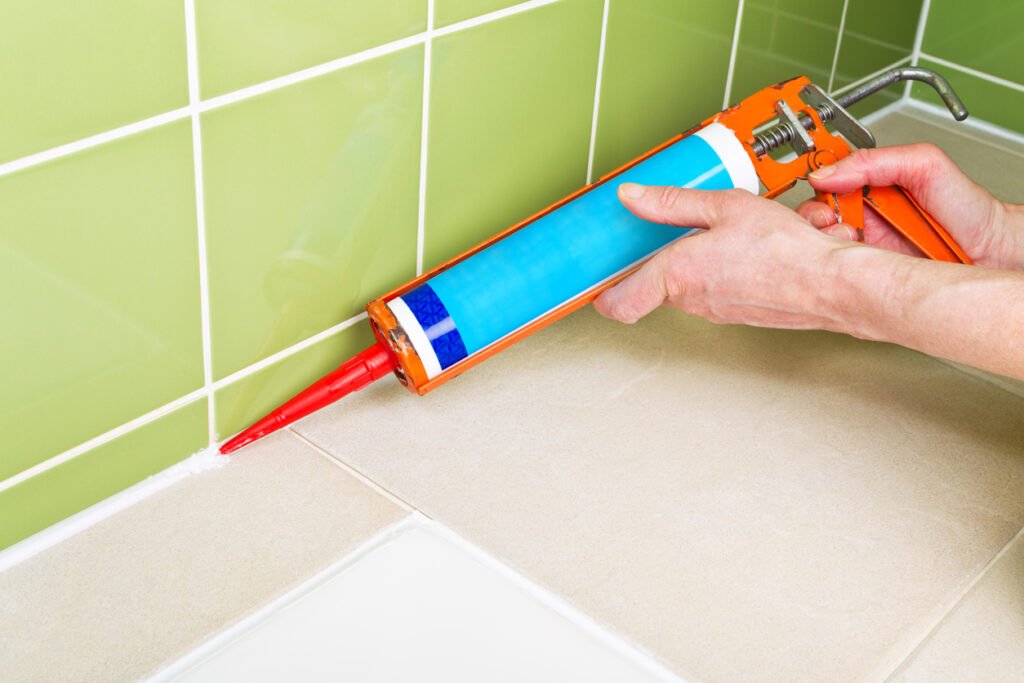
Look for 100% silicone sealant labeled for kitchen and bath use, with a mildew-resistant additive. Check the label for the products’ compatibility with your surfaces. Acrylic and siliconized acrylic caulks are easier to clean up and can be painted, but they generally don’t hold up as well in constant wet, which is why silicone is the usual choice for showers.
Bathtubs: fill the tub first. A tub full of water is at its heaviest, and it sits slightly lower than an empty one. If you caulk the gap while the tub is empty, the gap widens once the tub is filled and used, and the bead can crack or pull away. Fill the tub with water before caulking and leave it full while the silicone cures.
Then:
- Apply painter’s tape along both sides of the joint, leaving a gap about 3–5 mm wide for a neat line.
- Cut the nozzle tip at a 45-degree angle. Start with a small opening, roughly matched to the width of the gap. You can always cut a larger one, but you can’t take it back.
- Run a steady, continuous bead along the joint, pushing the nozzle slightly ahead of you so the sealant is forced into the gap rather than laid on top of it.
- Smooth the bead in a single pass with a caulk tool or a gloved fingertip. A light mist of soapy water or a wipe with rubbing alcohol keeps silicone from sticking to the tool, but manufacturers differ, so check your tube’s instructions.
- Remove the tape right after smoothing, before the surface skins over, pulling it away from the joint at a low angle.
Cure Time
Don’t use the shower until the silicone has cured. The label will give the time, and it’s typically 24 hours before water exposure, though some faster products differ and full cure can take longer. Cold, damp rooms slow curing, so allow more time if the weather is cool. Keep the bathroom ventilated during this time; fresh silicone gives off a strong vinegar-like smell that fades as it cures.
Why the Mold Comes Back
Replacing silicone or cleaning it treats the symptom. Mold returns when the bathroom stays damp, so prevention has more to do with drying than with cleaning.
The exhaust fan. It should run during the shower and for around 20 minutes afterward. A timer switch makes this automatic. A common rule of thumb for sizing is about 1 cubic foot per minute (CFM) of airflow per square foot of bathroom floor, with a minimum of about 50 CFM, though many fans are rated well above what they actually deliver once ducting is added. A simple check: hold a single sheet of toilet paper against the fan grille while it runs. If it doesn’t cling, the fan is weak, blocked, or poorly ducted. The fan also has to vent outside. Fans that vent into an attic simply move the moisture somewhere else.
Squeegee and towel. Wiping the walls and the tub edge for 30 seconds after showering removes the water that would otherwise sit along the bead for hours. It’s more effective than any spray.
Air the room. Leave the shower door open or the curtain spread wide so it dries rather than staying folded and wet. Don’t leave damp towels and bath mats on the floor.
A quick weekly wipe. A cloth with warm water and a little dish soap along the silicone lines removes soap film before mold can settle in. Routine bleaching isn’t necessary and can shorten the life of some sealants and fittings.
Check the bead itself twice a year. Look for cracks, lifting, or dark spots at the corners, where mold usually starts. Catching a gap early means a small repair rather than a full replacement.
When to Stop and Call Someone
Silicone mold is usually a surface problem. These situations suggest a larger one:
- Mold on the wall or ceiling beyond the sealant line, covering more than about 10 square feet in total
- Tiles that are loose, hollow-sounding, or coming away from the wall
- Soft, spongy, or discolored drywall or flooring near the shower
- A persistent musty smell even after you’ve cleaned and replaced the sealant
- Signs of an active leak, such as water stains on the ceiling below or dampness that doesn’t dry
In those cases the moisture is coming from somewhere other than daily use, and a plumber or a qualified mold remediation contractor should look at it before any cosmetic fix is made.
Questions Readers Ask
Can I put new silicone over old silicone?
Not if you want it to last. Fresh silicone doesn’t bond well to cured silicone, and any mold left underneath continues to grow. Remove the old bead and its residue first.
Is the black stuff in my shower “toxic black mold”?
You can’t tell by color. Many kinds of mold appear black or dark green, and the species can’t be identified by eye. General guidance from health agencies is to clean or remove visible mold safely rather than trying to work out which type it is. If you’re having health symptoms you think are connected, mention it to a doctor.
How soon can I shower after cleaning with bleach or vinegar?
Once the area has been rinsed with water, dried, and the room has aired out, there’s no reason to wait longer. If you used a commercial product, follow its label, since some specify a wait before water contact.
The Short Version
Clean the soap film first, treat the mold with a cleaner that suits your shower’s surfaces, and check the result the next morning. If dark spots survive two rounds or come back within weeks, cut the bead out, remove the residue, let the joint dry for a full day, and re-seal it with kitchen-and-bath silicone. Then run the fan for 20 minutes after every shower, because that habit does more to protect the new bead than anything you’ll spray on it.